Getting Started with Phidgets and ActionScript 3
Phidgets are a set of devices and sensors that provide a simple way for developers to create applications that both send and receiving information from external sensors, motors and pretty much anything else you can hook up via electronics. They are similar to the open source Arduino electronic platform.
Im not going to do a big comparison between Arduino and Phidgets in this post. I plan to do that in another post (along with an Arduino / Flash hello world article). Suffice it to say though, that one of the major benefits of Phidgets, is that the Phidgets devices are a bit higher level, both on the hardware, and software side and thus can be a little easier for a developer new to electronics to get started with.
If you are a Flash developer, Phidget’s are very attractive, as they provide a very well developed and documented ActionScript API for working with the Phidgets devices. The API works by connecting via a socket from Flash content, to a Phidgets local (or remote) server. The Phidgets server connects directly to the Phidgets devices over USB, and proxies communication between the Flash / ActionScript content, and the Phidgets devices and electronics.
In this post, I will cover everything you need to know in order to get started integrating Phidgets electronics and Flash / ActionScript content.
You can grab all of the code for the example from my GitHub Example repository.
First, here is what you will need to get started:
- An ActionScript 3 compiler (such as Flash Builder, Flash Professional, or the open source MXMLC compiler included in the Flex 4 SDK).
- An IDE or text editor to edit ActionScript (such as Flash Builder, Flash Authoring, FDT, TextMate or any other general text editor).
- The Phidgets ActionScript 3 library. You can find the library’s SWC in Flex 3 Code Sample ZIP file, and can find the source in the Flash AS3 Code Sample Zip file, both on the Phidgets programming resources page.
- The Phidgets drivers for your platform. This will install the drivers for the devices, as well as the proxy application / server that Flash will use to communicate with the devices. You can download these from the Phidgets driver page.
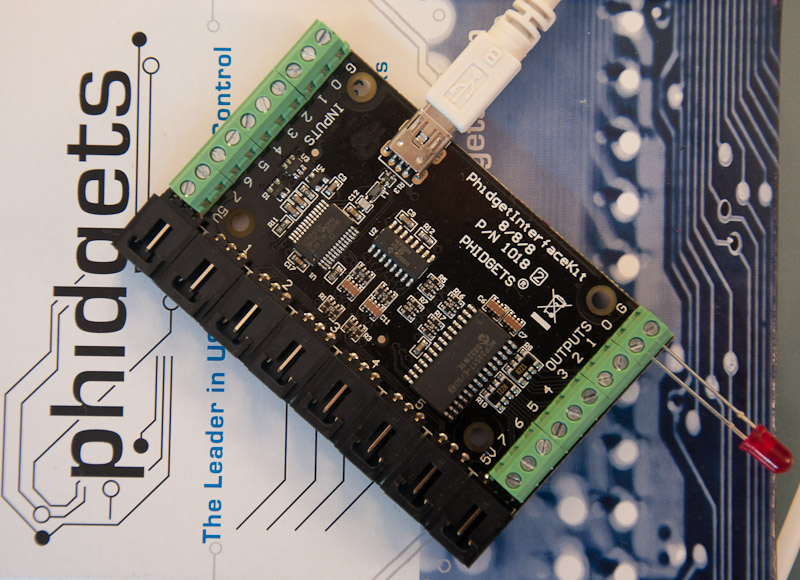
- At least one Phidgets device that can connect directly to your computer USB. If you are just getting started, then I would recommend the 1018 - PhidgetInterfaceKit 8/8/8 as it is the most flexible and extensible. This article will assume you are using this kit.
- One LED to test the kit with.
For this article I will be using TextMate on a Mac and compiling with the free mxmlc compiler included in the Flex 4 SDK. We will be running the example via Adobe AIR (via ADL included in the Flex 4 SDK) (although the SWF we create will also work in the Flash Player in the browser).
Install Drivers
First, download and install the Phidgets drivers for your platform. This will install the drivers to interface with the devices via USB, and will also install a standalone application / server that will proxy calls between Flash and the devices.
Test Installation
Once you have installed the drivers, download the manual for the 1018 - PhidgetInterfaceKit 8/8/8. I strongly recommend you read through the entire PDF document, but at a minimum, you will want to read the “Product Features” and “Getting Started”" sections.
Connect your Phidget via USB to your computer and then read and follow the steps under the Getting Started > Testing section in the 1018 docs. This will show you how to ensure that your Phidgets and software are setup and functioning correctly. Make sure to run the sample program as described in the docs.
Download Phidget ActionScript Library
In order to communication with the Phidgets devices / proxy application via ActionScript, we need to download the Phidgets ActionScript library. There are two Flash related libraries on the Phidgets Programming Resources page. The Flash AS3 download contains example FLAs to be run in Flash Authoring (4 or 5), as well as the source code for the Phidgets ActionScript library. The Flex AS3 download contains both Flex / MXML and pure ActionScript examples, as well as the Phidget AS3 Library SWC. You can also download API references and a getting started guide on the page.
You can use either the Phidget library source from the Flash AS3 download, or the Phidget library SWC from the Flex AS3 download. Just make sure to link them in when compiling your ActionScript. For this article I will be using the compiled SWC.
Configure the Phidget
For our simple hello world example, we are going to connect an LED to our Phidget and then turn it on via ActionScript. In order to do this, we need to connect an LED to the PhidgetInterfaceKit. Connect an LED to output pins G (Ground) and 0. Make sure that the long wire (anode) of the LED is connected to pin 0, and the short wire (cathode) is connect to the ground (G).
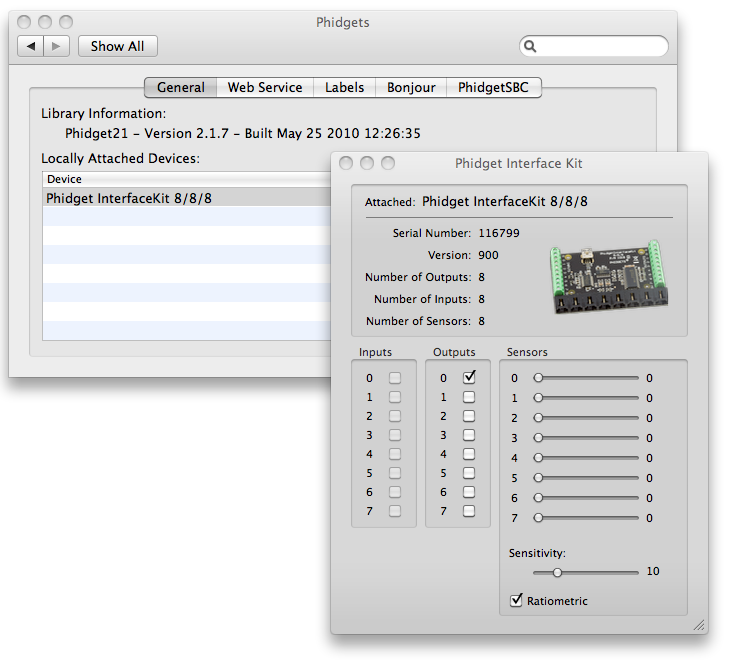
Next, make sure that the Phidget is connected to the computer via USB. You can test that everything is connected and hooked up correctly by opening the Phidget preferences, and selecting output 0 on the Phidget Interface Kit screen. This should turn on the LED (make sure to turn it off once you are done).
Turn on Phidget Proxy / Server
The last step before we can write our code is to make sure that the Phidget proxy / web server is running. This is a simple socket server that runs locally and proxies calls between Flash and the Phidget.
On Mac, you can start this in System Preferences > Phidgets > Web Service > Start Web Service. Check the documentation for how to start it on other platforms.
For now you can leave the ServerID and Password blank, and leave the port at its default value of “5001”.
Write ActionScript Code
We are finally ready to write the ActionScript code to interface with the Phidget.
Open you ActionScript editor, and type in the following code in a file named PhidgetsHelloWorld.as. The code below is fully commented and explains what is going on.
/*
	The MIT License

	Copyright (c) 2010 Mike Chambers

	Permission is hereby granted, free of charge, to any person obtaining a copy
	of this software and associated documentation files (the "Software"), to deal
	in the Software without restriction, including without limitation the rights
	to use, copy, modify, merge, publish, distribute, sublicense, and/or sell
	copies of the Software, and to permit persons to whom the Software is
	furnished to do so, subject to the following conditions:

	The above copyright notice and this permission notice shall be included in
	all copies or substantial portions of the Software.

	THE SOFTWARE IS PROVIDED "AS IS", WITHOUT WARRANTY OF ANY KIND, EXPRESS OR
	IMPLIED, INCLUDING BUT NOT LIMITED TO THE WARRANTIES OF MERCHANTABILITY,
	FITNESS FOR A PARTICULAR PURPOSE AND NONINFRINGEMENT. IN NO EVENT SHALL THE
	AUTHORS OR COPYRIGHT HOLDERS BE LIABLE FOR ANY CLAIM, DAMAGES OR OTHER
	LIABILITY, WHETHER IN AN ACTION OF CONTRACT, TORT OR OTHERWISE, ARISING FROM,
	OUT OF OR IN CONNECTION WITH THE SOFTWARE OR THE USE OR OTHER DEALINGS IN
	THE SOFTWARE.
*/

package
{
	import flash.display.Sprite;
	import flash.events.Event;

	//import the Phidget classes we need for this example
	//from the Phidget's library / SWC
	import com.phidgets.Phidget;
	import com.phidgets.PhidgetInterfaceKit;
	import com.phidgets.events.PhidgetEvent;

	public class PhidgetsHelloWorld extends Sprite
	{

		//reference to the Phidget Interface Kit we are connecting to
		private var interfaceKit:PhidgetInterfaceKit;

		//constructor
		public function PhidgetsHelloWorld()
		{
			//listen for when we are added to the stage
			addEventListener(Event.ADDED_TO_STAGE, onAddedToStage);
		}

		private function onAddedToStage(e:Event):void
		{
			removeEventListener(Event.ADDED_TO_STAGE, onAddedToStage);

			//create instance of PhidgetInterfaceKit
			interfaceKit = new PhidgetInterfaceKit();

			//listen for event that we need for this example

			//connected to proxy
			interfaceKit.addEventListener(PhidgetEvent.CONNECT,	onConnect);

			//device attached
			interfaceKit.addEventListener(PhidgetEvent.ATTACH,	onAttach);

			//device detached
			interfaceKit.addEventListener(PhidgetEvent.DETACH,	onDetach);

			//disconnected from proxy
			interfaceKit.addEventListener(PhidgetEvent.DISCONNECT, onDisconnect);

			//proxy address. Usually localhost / 127.0.0.1, but can be any server
			//on any computer. The proxy returns proper security policy file
			var serverAddress:String = "127.0.0.1";

			//port the proxy is listening on
			var serverPort:uint = 5001;

			//connect to the proxy and device
			interfaceKit.open("127.0.0.1", 5001);
		}

		//called when we connect to the proxy server
		private function onConnect(e:PhidgetEvent):void
		{
			//note, we cannot access any devices here yet, since
			//we have not connected to them. You have to wait for the
			//onAttach event
			trace("-------onConnect------- ");
		}

		//called when we attach / connect to the actual Phidget
		private function onAttach(e:PhidgetEvent):void
		{
			trace("-------onAttach------- ");

			//get a reference to the device we connected to
			var device:Phidget = e.Device;

			//print out a bunch of information about it
			trace(device.Name + " : " + device.Label);
			trace("Version : " + device.Version);
			trace("Serial : " + device.serialNumber);


			//output number / pin that the LED is connected to
			var outputPin:uint = 0;

			//state to set the output pin. true = on, false = off
			var state:Boolean = true;

			//set the output state for pin 0 to true / on.
			//this will turn on the LED
			interfaceKit.setOutputState(outputPin, state);

			//note, you have to explicitly turn it off, or else
			//it will stay on, even after the program has stopped running
		}

		//called when a device is detached. i.e. the USB cable is disconnected
		//while the program is running
		private function onDetach(e:PhidgetEvent):void
		{
			//you cannot access the devices here.
			trace("-------onDetach------- ");
		}

		//called once the connection to the proxy server is closed.
		private function onDisconnect(e:PhidgetEvent):void
		{
			//you cannot access the devices here
			trace("-------onAttach------- ");
		}
	}
}
I am going to run this via ADL (Adobe AIR) included in the Flex SDK, and thus also need the following PhidgetHelloWorld-app.xml file:
<?xml version ="1.0" encoding="utf-8" ?>
<application xmlns="http://ns.adobe.com/air/application/2.0">
	<id>PhidgetsHelloWorld</id>
	<version>1.0</version>
	<filename>PhidgetsHelloWorld</filename>
	<description></description>
	<name>PhidgetsHelloWorld</name>
	<copyright></copyright>
	<initialWindow>
		<content>PhidgetsHelloWorld.swf</content>
		<systemChrome>standard</systemChrome>
		<transparent>false</transparent>
		<visible>true</visible>
		<fullScreen>false</fullScreen>
		<autoOrients>false</autoOrients>
		<aspectRatio>portrait</aspectRatio>
		<renderMode>auto</renderMode>
	</initialWindow>
	<customUpdateUI>false</customUpdateUI>
	<allowBrowserInvocation>false</allowBrowserInvocation>
	<icon>
	</icon>
</application>
I am running it via ADL / Adobe AIR as it will easily allow me to see the trace output on the command line.
Here is the command to compile the program using MXMLC:
mxmlc -library-path+=Phidget21Library.swc PhidgetHelloWorld.as
foo
You may receive a warning about runtime shared libraries. You can safely ignore this.
If you get an error that mxmlc cant be found, then make sure you have added the FLEXSDK/bin directory to your system’s path.
If you receive any errors, make sure you are linking in the Phidget library correctly. Once it compiles, you can test it on the command line with the following command:
adl PhidgetHelloWorld-app.xml
When I run this on my machine the LED turns on on the Phidget, and I get the following output on the command line:
-------onConnect-------
-------onAttach-------
Phidget InterfaceKit 8/8/8 :
Version : 900
Serial : 116799
If you run the SWF in the player, then you should see the LED turn on. If you run in Flash Authoring (FLA included) or FlashBuilder, then you should also see the trace output in the output panel.
Notice that once you close the program, the LED is still on. You have to explicitly turn off the LED. You can do this by modifying the code to turn it off, and then run it again.
This is an important point. The device may maintain its state even after the program has stopped running. Because of this, you should always set the device to a known state when your application starts up, and make sure it is in the correct state when you shut down your program.
Once you are at this point, it is just a matter of hooking up additional sensors, motors and outputs. The Phidgets ActionScript library is very well written, and makes it easy to work with additional Phidgets.
Make sure to check out all of the Phidgets and ActionScript related docs on the Phidgets site, as well as the Phidgets ActionScript forum.
If you find any errors, or have any questions or suggestions, then please leave them in the comments.


